Portainer is an open-source lightweight management UI which allows you to easily manage your Docker host or Swarm cluster. Portainer provides a detailed overview of Docker and allows you to manage containers, images, networks and volumes via simple web-abed dashboard. It was originally the fork of Docker UI. Here, will show you how to install Portainer and how to manage docker containers using Portainer in Linux.
Manage Docker Using Portainer
Install Portainer
Portainer installation is pretty easy and it will take less than a minute. Portainer has full support for Docker version 1.10 and higher versions. To install Docker, refer the following links.
- How to Install docker on RHEL/CentOs 7
- How to install Docker on Ubuntu
- How to Install and start Docker on RHEL/Centos 6
After installing Docker, run the following command to pull the latest Portainer image:
# docker pull portainer/portainer

We can see the downloaded the image using docker images command,
# docker images
portainer/portainer latest b073c72b9a2b 13 hours ago 9.162 MB
As you see in the above output, Portainer image size is less than 10 MB, which is very small so that it won’t consume more RAM and Hdd space.
We have now Portainer in our local Ubuntu system. Let us start the container using command:
# docker run -d -p 9000:9000 -v /var/run/docker.sock:/var/run/docker.sock portainer/portainer
Great, successfully launched the Portainer container. Now let access Portainer webUI using http://localhost:9000/ or http://IP_Address:9000/ URL. You will be presented with a screen like below that asks to setup a password for the admin user.
Enter the password twice and hit Validate button to create the admin user password.

In the next screen, enter the admin user which you just created in the previous step.

Next, Connect Portainer to a Docker engine or Swarm cluster endpoint. We don’t have any running remote docker instances. So I choose “Manage the Docker instance where Portainer is running” option.

Once connected, you will be presented with a dashboard like below.

The dashboard home screen displays the running and stopped containers, number of downloaded docker images, number of volumes and networks. Let create some containers from webUI.
Creating Containers
Click on the App Templates button on the left. This will show some ready-made available templates such as Docker image registry, Nginx, Httpd, MySQl, redis and few more.

To deploy a Container, just click on the respective template. Let us launch elasticsearch Container. To do so, click on the elasticsearch template. Enter the Container name, select network type (ex.bride mode). click on Show advanced options and set port number.
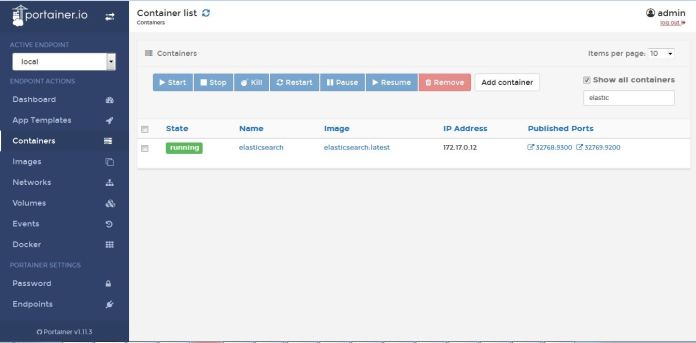
Finally, Click Create. Once the container created, you will be redirected to the Containers page that shows the list of running containers.

To start a newly created container, just select it and hit Start button on the top. You can restart, stop, pause, and remove any Containers from this section.
To view the complete overview of any container, just click on the name of the container.

Click on the Stats button to view what’s happening in the newly launched Container.
Here is the Stats of elasticsearch container.

Similarly, click on the Logs button to view complete log details of the Container.

Here is the console option to connect your container console button.
Select the Shell (BASH or SH), and hit Connect button.

Docker Images
In this section, you can view the list of downloaded docker images.

To remove any image, just select it and click Remove. The selected image will be gone.
Networks
Networks section will allow you to add a new network, change the network type, assign/change IP address, remove existing networks.

Docker
This section displays the Docker engine version, Host OS name, type, architecture, cpu, memory, network details etc.

Endpoint:


