

What Is a Reverse Proxy?
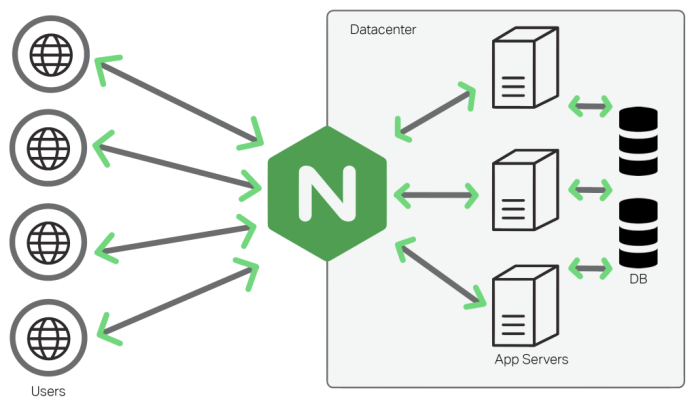
A reverse proxy is an intermediary proxy service which takes a client request, passes it on to one or more servers, and subsequently delivers the server’s response to the client. A common reverse proxy configuring is to put Nginx in front of an Apache web server. Using this method will allow both web servers to work together enabling each to do what they do best. Learn more about the differences between Nginx vs Apache.
This post will outline the benefits of using an Nginx reverse proxy as well as how to configure one.
Benefits of an Nginx Reverse Proxy
There are a few benefits to setting up an Nginx reverse proxy. Although not required in all cases, it can be beneficial depending upon your particular scenario / setup. The following outlines a few benefits implementing a reverse proxy.
- Load Balancing – A reverse proxy can perform load balancing which helps distribute client requests evenly across backend servers. This process greatly helps in avoiding the scenario where a particular server becomes overloaded due to a sudden spike in requests. Load balancing also improves redundancy as if one server goes down, the reverse proxy will simply re-route requests to a different server. Read our complete article to learn more about load balancing.
- Increased Security – A reverse proxy also acts as a line of defense for your backend servers. Configuring a reverse proxy ensures that the identity of your backend servers remains unknown. This can greatly help in protecting your servers from attacks such as DDoS for example.
- Better Performance – Nginx has been known to perform better in delivering static content over Apache. Therefore with an Nginx reverse proxy, all client requests can be handled by Nginx while all requests for dynamic content can be passed on to the backend Apache server. This helps improve performance by optimizing the delivery of assets based on their type. Additionally, reverse proxies can also be used to serve cached content and perform SSL encryption to take a load off the web server(s).
- Easy Logging and Auditing – Since there is only one single point of access when a reverse proxy is implemented, this makes logging and auditing much simpler. Using this method, you can easily monitor what goes in and out through the reverse proxy.
Here we run several hosts on the same public IP, and we could only forward port 80 or 443 to one specific internal IP. So to solve this we needed a reverse proxy that can handle the traffic.
Install Nginx
Please refer below link to install nginx on Redhat/CentOS
- Install Nginx on Ubuntu
To install on Ubuntu, run below commands,
# apt-get update
# apt-get install nginx
To start the nginx,
# service nginx start
- Install Nginx on CentOS
Create your first virtual host (port 80)
# cd /etc/nginx/sites-available/
# vi virtualhost1.conf
Put this in the vhost. The red colored values are the ones you change based on your env setup
server {
# The IP that you forwarded in your router (nginx proxy)
listen 192.168.0.10:80 default_server;
# Make site accessible from http://localhost/
server_name site1.foxutech.com;
# The internal IP of the VM that hosts your Apache config
set $upstream 192.168.0.11;
location / {
proxy_pass_header Authorization;
proxy_pass http://$upstream;
proxy_set_header Host $host;
proxy_set_header X-Real-IP $remote_addr;
proxy_set_header X-Forwarded-For $proxy_add_x_forwarded_for;
proxy_http_version 1.1;
proxy_set_header Connection "";
proxy_buffering off;
client_max_body_size 0;
proxy_read_timeout 36000s;
proxy_redirect off;
}
}
Create virtual host2
# cd /etc/nginx/sites-available/
# vi virtualhost2.conf
Put this in your second virtualhost:
server {
# The IP that you forwarded in your router (nginx proxy)
listen 192.168.0.10:80; # this is not the default_server
# Make site accessible from http://localhost/
server_name site2.foxutech.com;
# The internal IP of the VM that host you Apache config
set $upstream 192.168.0.21;
location / {
proxy_pass_header Authorization;
proxy_pass http://$upstream;
proxy_set_header Host $host;
proxy_set_header X-Real-IP $remote_addr;
proxy_set_header X-Forwarded-For $proxy_add_x_forwarded_for;
proxy_http_version 1.1;
proxy_set_header Connection "";
proxy_buffering off;
client_max_body_size 0;
proxy_read_timeout 36000s;
proxy_redirect off;
}
}
If you want to have more hosts on port 80, you just copy the vhosts to a new file and change the site name and IP details along with reverse proxy detail.
# cp /path-to-working-virtualhost.conf /path-to-new-virtualhost.conf
Activate the virtualhosts by linking them to…/sites-enabled/
# ln -s /etc/nginx/sites-available/virualhost.conf /etc/nginx/sites-enabled/virtualhost.conf
You can do same for all your virtual hosts.
Restart Nginx
# service nginx restart
Now the config for port 80 is done. Let’s move over to the SSL config.
Create a virtualhost with SSL (port 443)
# cd /etc/nginx/sites-available/
# vi virtualhost3.conf
Put this in your SSL config. The red colored values are the ones you change based on your env setup
server {
listen 192.168.0.10:443 ssl;
# SSL config
ssl on;
 ssl_certificate /etc/nginx/ssl/ virtualhost3.pem;
 ssl_certificate_key /etc/nginx/ssl/ virtualhost3.key;
# Make site accessible from http://localhost/
server_name domain3.com site3.foxutech.com;
set $upstream 192.168.0.31;
location / {
proxy_pass_header Authorization;
proxy_pass https://$upstream;
proxy_set_header Host $host;
proxy_set_header X-Real-IP $remote_addr;
proxy_set_header X-Forwarded-For $proxy_add_x_forwarded_for;
proxy_http_version 1.1;
proxy_set_header Connection "";
proxy_buffering off;
client_max_body_size 0;
proxy_read_timeout 36000s;
proxy_redirect off;
proxy_ssl_session_reuse off;
}
}
Put your cert files on the nginx system
# mkdir /etc/nginx/ssl
Move your SSL certs to that folder
Move the pem and the ssl key to your Nginx system from your system:
# scp -r /etc/ssl/ssl.pem* user@NGINX-IP:/tmp
# scp -r /etc/ssl/ssl.key* user@NGINX-IP:/tmp
Move the files to the correct folder on your Nginx system:
# mv /tmp/ssl.key /etc/nginx/ssl/vhost3.key
# mv /tmp/ssl.pem /etc/nginx/ssl/vhost3.pem
Activate the SSL vhost
# ln -s /etc/nginx/sites-available/ virtualhost3.conf /etc/nginx/sites-enabled/ virtualhost3.conf
Restart Nginx
Now the SSL setup is done and the only thing left to do is to restart Nginx and see the magic.
# service nginx restart
Redirect traffic from port 80 to 443 (HTTP to HTTPS)
put this in your Nginx SSL conf:
server {
listen 192.168.0.101:80;
server_name site.foxutech.com;
return 301 https://site.foxutech.com$request_uri;
}
replace server_name with your server name.
Restart Nginx
# service nginx restart
Test that it works
root@NGNIX:/etc/nginx/sites-available# curl -I http://site.foxutech.com
HTTP/1.1 301 Moved Permanently
Server: nginx/1.9.14
Date: Wed, 17 Mar 2017 09:56:28 GMT
Content-Type: text/html
Content-Length: 185
Connection: keep-alive
Location: https://site.foxutech.com/
Modifications in Apache 2.4
To allow apache to listen remote address, we have mentioned the details in apache. For that follow below steps,
enable mod_remoteip
# a2enmod remoteip
Create remoteip.conf
# vi /etc/apache2/conf-available/remoteip.conf
Add config to remoteip.conf:
RemoteIPHeader X-Forwarded-For
RemoteIPTrustedProxy 192.168.0.10
Activate the new config
# a2enconf remoteip
# service apache2 restart
A modification is required in apache2.conf:
While the remote IP address is injected into PHP just fine, Apache2 continues to log 192.168.0.10 as the remote IP address in access.log. You have to change this:
LogFormat "%h %l %u %t \"%r\" %>s %O \"%{Referer}i\" \"%{User-Agent}i\"" combined
To this:
LogFormat "%a %l %u %t \"%r\" %>s %O \"%{Referer}i\" \"%{User-Agent}i\"" combined
%h has to be replaced with %a. We’re not sure if this is a bug or not but Apache2 will log the real remote IP address from now on.
